Introduction
In this article, we'll discuss the Program Settings.
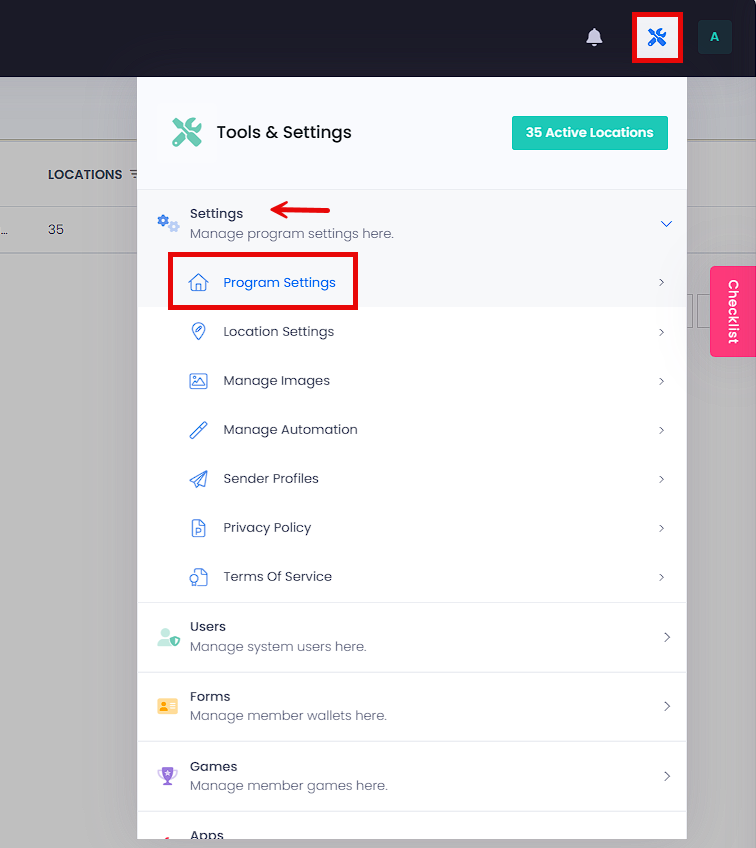
The program settings can be found at the Tools and Settings icon > Settings tab > Program Settings sub-tab.
Basic Setup Tab
This page shows the necessary program settings, which may already be complete. However, you can still modify the program name, the point term, and the plural points term, the member term, the plural member term, and dashboard settings to suit your program's requirements.

NOTE:
- Point Term - If a different term besides Point is required, enter it here. Do not make plural.
- Points Term - If a different term besides Points is required, enter it here. You can make plural.
- Member Term - If a different term besides Member is required, enter it here. Do not make plural
- Risk Member - A member is tagged at risk if a transaction or check-in has not occurred in the specified time period.
- Inactive Member - A member is tagged lost if a transaction or check-in has not occurred in the specified time period.
On the dashboard, you have the option to adjust the settings for identifying members who are at risk or lost. However, keep in mind that each business program is unique, and this feature is only for visual purposes and does not affect the triggers. Once you've set these options, you can create triggers that align with your settings.


When it comes to point management, you have the choice between a rounding points program or an exact match program. The latter, exact match, is a precise method commonly used with visit type and check-in type programs. On the other hand, rounding points are more suitable for spending programs. Points always round down. For example, if a transaction has a spend of $10.25, and we were issuing one point for every dollar spent, the points would round down to 10 points. Similarly, if the spend were $10.99, it would be rounded down to 10 points. As you can see, the points always round down every time a transaction occurs.

- Exact Match - The “Exact Match" point type displays points at a two decimal level. The thousands place always rounds down i.e. 10.999 = 10.99. This point count is typically used for cash back reward programs. This setting tracks the exact amount of points a member earns. For instance, in the above example, the Member has 10.99 points, but the program display settings could be set to "Display Whole Number" and 10 will display in the Member profile. In this situation, the Member has 10.99 redeemable points but only sees 10. If a transaction is made for .01, the Member will now have 11 visible points. The same rule applies for "Display One Decimal" and "Display Two Decimals." Display settings are for visual purposes only.
- Round Points - The "Rounding" point type displays whole number points and no decimals. The decimal place always rounds down, i.e. 10.99 = 10. If using the rounding feature, the .99 points are not carried over. In this example, the Members redeemable points are 10.
You have the option to set the points that are given to members for completing surveys, filling out their profile information, and referring friends. A successful friend referral is considered when the referred friend completes their profile, visits the business, and makes their first transaction. Once successful, the referrer will receive points as a reward.

- Restrict Referral Points – If On, referral points do not issue to the referrer until the referee reaches the point total entered here. Once reached, referral points are issued as expected.
You may choose to turn on a max point rule, and a max point rule prevents members from accumulating unlimited amounts of points. For example, a maximum point rule of 500 required the member to redeem a reward once 500 points are reached before earning more points.

- Max Points Rule - To have no Max Point Rule use the default value 0 and toggle off.
To create extra point days, toggle the “Extra Point Days” On. To create a one-time extra point day, use the “Month” button. To create an ongoing template of extra points days each week, click the “Template” button.

For instance, an “All Day” double point Tuesday on the “Template” settings will create an All Day Double Point setting for every Tuesday moving forward.

The Month view will look like this.

Branding Tab
You can use the branding tab to modify your company logo, default offer image, and default location images. If you toggle On the "Replace All Location Images" feature and save it, the new image will replace all existing location images.

NOTE:
- Company Logo Image - The company logo brands your reward program. It displays emails, the member profile, tablet apps, & mobile apps. Updating the image here will update in all places.
- Default Offer Image – This is the default image used when creating an offer. If you do not wish to use the default image, you may replace it with a company logo or any image you choose.
- Replace All Location Images - If toggled On, it overrides the existing location images.
- Default Location Image: 1080 x 720px – The image acts as the default image for all locations. If an individual location image is uploaded, the default location image will not be replaced unless the toggle is turned On.
Theme Settings
To customize the color Theme Settings, select a pre-made template or modify the colors in the Primary Colors Toggle. When you click Save, the new colors will be updated throughout the program.

SMS Reply Settings
SMS Aggregators require default SMS text. To customize the default messages, do so here.

API Settings
If permissions are given, you will have access to the API Settings. You can see your Program Token used for API connections and a toggle to turn on Web Hooks if you are receiving real-time transactions.

Backoffice Settings
Choose to send Weekly and Monthly reports to team members. Toggle the report On, and choose which user roles receive reports. Under the notification settings, choose who receives Low Credit reminders and Negative Feedback notifications.

- Account Notification Emails - This email addresse(s) are used for following purpose:
- Receive Credit Reminder emails.
- Receive Survey Negative feedback.
- Weekly Reports - If ON, weekly reports will email to each approved user class.
- Subject - Subject will appear on each email report.
- Weekly Sending Time - Choose the day & time the report will send.
If you have any questions, please create a ticket, and one of our support reps will contact you shortly. Thank you.